TL;DR:
- Proper stairlift placement is crucial for safety, comfort, and long-term effectiveness.
- Detailed measurements and professional surveys ensure correct rail positioning and function.
- Regular safety checks and periodic reviews help adapt to changing household needs and prevent accidents.
Poor stairlift placement is one of the most overlooked causes of falls and mobility setbacks in UK homes. A unit fitted too close to the wall, a rail that doesn't extend fully to the landing, or a seat that swivels the wrong way can turn a helpful aid into a daily frustration or, worse, a genuine danger. Getting placement right from the outset isn't just about comfort; it directly shapes how confidently and safely you or your loved one moves through the home every single day. This guide walks you through every stage, from preparation to long-term maintenance, so you can make informed decisions and avoid costly mistakes.
Table of Contents
- Essential requirements for optimal stairlift placement
- Step-by-step process to optimise stairlift placement
- Safety checks and functional testing after installation
- Troubleshooting and optimising for long-term safety
- A fresh perspective on stairlift placement: safety is a dynamic process
- Find the right stairlift solutions for your home
- Frequently asked questions
Key Takeaways
| Point | Details |
|---|---|
| Get the essentials right | Start with accurate measurements and the correct safety features for your home. |
| Follow expert steps | Use clear guidance to ensure comfortable and hazard-free stairlift placement. |
| Test and review regularly | Verify all safety functions and update placement as household needs change. |
| Professional support matters | Specialist help can prevent mistakes and ensure long-term reliability. |
Essential requirements for optimal stairlift placement
Having outlined the importance of proper placement, let's start by identifying what you'll need before installing your stairlift.
Before any engineer arrives at your door, you should understand what makes your staircase unique. Staircases in UK homes vary enormously. Victorian terraces often feature steep, narrow stairs with tight turns. Modern new-builds tend to have wider, shallower steps. Some homes have quarter-turn or half-turn landings that break the stair into two or more straight sections. Each configuration changes what type of stairlift is appropriate and, critically, where it can be safely positioned.
The three key staircase types you'll encounter are straight stairs, which need a standard straight rail; curved stairs, which require a custom-bent rail; and stairs with intermediate landings, which may need either two separate stairlifts or a continuous curved rail. Knowing your staircase type is the foundation of matching stairlift to stairs correctly.
Beyond the stair shape, you need to think about width. The British Standard for stairlifts recommends a minimum clear width of 600mm on the stair when the lift is parked, so that ambulant household members can still pass safely. Narrower stairs are not automatically a dealbreaker, but they significantly limit your product options.
What the stairlift itself must include
Modern stairlifts come with a range of safety features that aren't optional extras; they're essential. According to guidance on stairlift safety features, every unit should include obstruction sensors on the footrest and carriage, a seatbelt, an emergency stop button, a swivel seat to allow safe exit at the top landing, and a battery backup system that keeps the lift operational during a power cut. Each of these features must be tested rigorously after installation, not simply assumed to work.
Knowing how to install a stair lift safely also means understanding that power supply matters. Most stairlifts charge from a standard 13-amp socket and run on a rechargeable battery, which is why the socket must be positioned at the top or bottom of the rail without creating a trip hazard from trailing cables.
Pre-installation checklist
| Prerequisite | Detail to confirm |
|---|---|
| Stair length | Measure from floor to floor along the stair line |
| Stair width | Minimum 600mm clear when lift is parked |
| Landing space | Check top and bottom for safe exit and swivel |
| Power supply | 13-amp socket within reach, no trailing cables |
| User mobility level | Seated, perch, or standing lift required? |
| Wall condition | Solid enough for rail bracket fixing |
| Household members | Can other users still pass safely? |
Key safety features to confirm before purchase:
- Obstruction sensors: Must halt the lift if anything blocks the path
- Seatbelt: Should lock securely and be easy to operate with one hand
- Emergency stop: Positioned on the armrest or joystick, easily reachable
- Swivel seat: Locks at the top to allow safe dismount onto the landing
- Battery backup: Provides at least several full journeys during a power cut
Step-by-step process to optimise stairlift placement
With your requirements gathered, it's time to follow each step to ensure your stairlift is positioned correctly for everyday use.
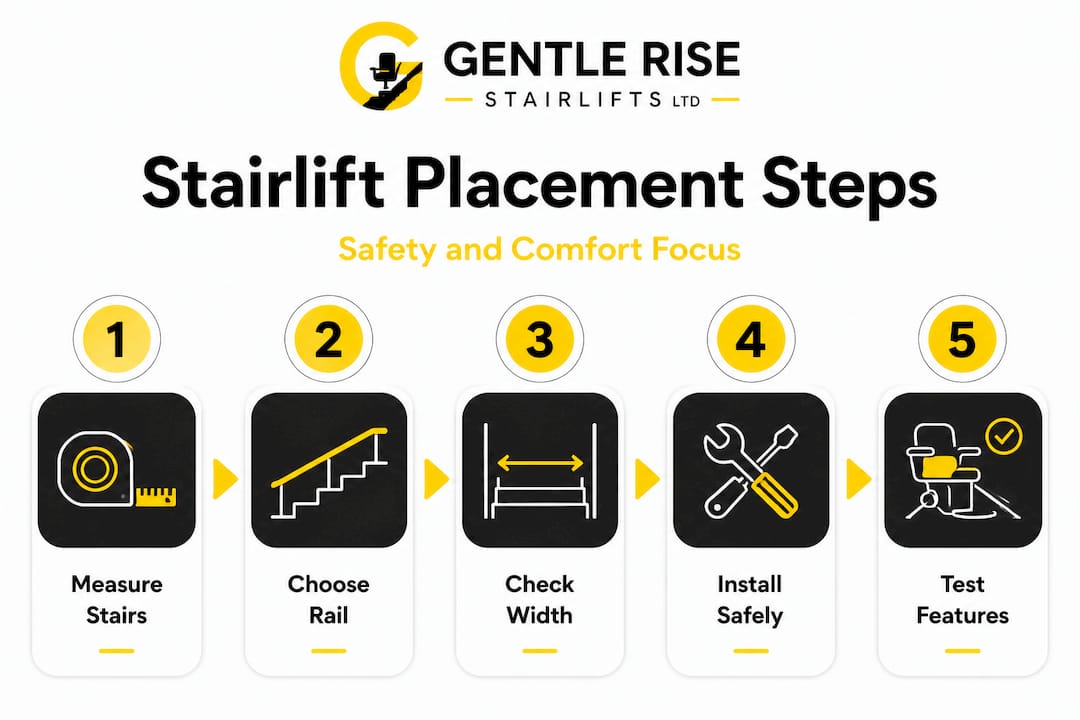
Getting placement right is a process, not a single decision. Rushing any stage can lead to problems that are expensive and disruptive to fix later. Here is a practical sequence to follow.
-
Measure everything twice. Take the stair length, width, and the height and depth of each step. Note any obstructions such as radiators, light switches, or banister posts that could interfere with the rail or carriage.
-
Identify the parking position. Decide where the chair will rest when not in use. At the bottom, it should fold clear of the hallway. At the top, it must not obstruct the landing or any doors that open onto it.
-
Plan the rail run. The rail should extend fully from the bottom floor to the top landing. This means it often overruns the last step slightly to give the user a level exit point. This is where many homeowners make a costly error.
-
Avoid short-landing workarounds. It is tempting to bridge a short intermediate landing with a folding platform rather than a continuous rail, but guidance on stairlift configurations is clear: folding platforms over short landings create significant trip hazards and should be avoided wherever possible. Full rail coverage is always the safer choice.
-
Confirm the seat orientation and swivel direction. The seat should swivel to face away from the stairwell at the top landing, allowing the user to step off safely without turning awkwardly.
-
Check clearances on both sides. There should be at least 50mm between the stairlift carriage and the wall, and the folded footrest must not block stair access for other users.
-
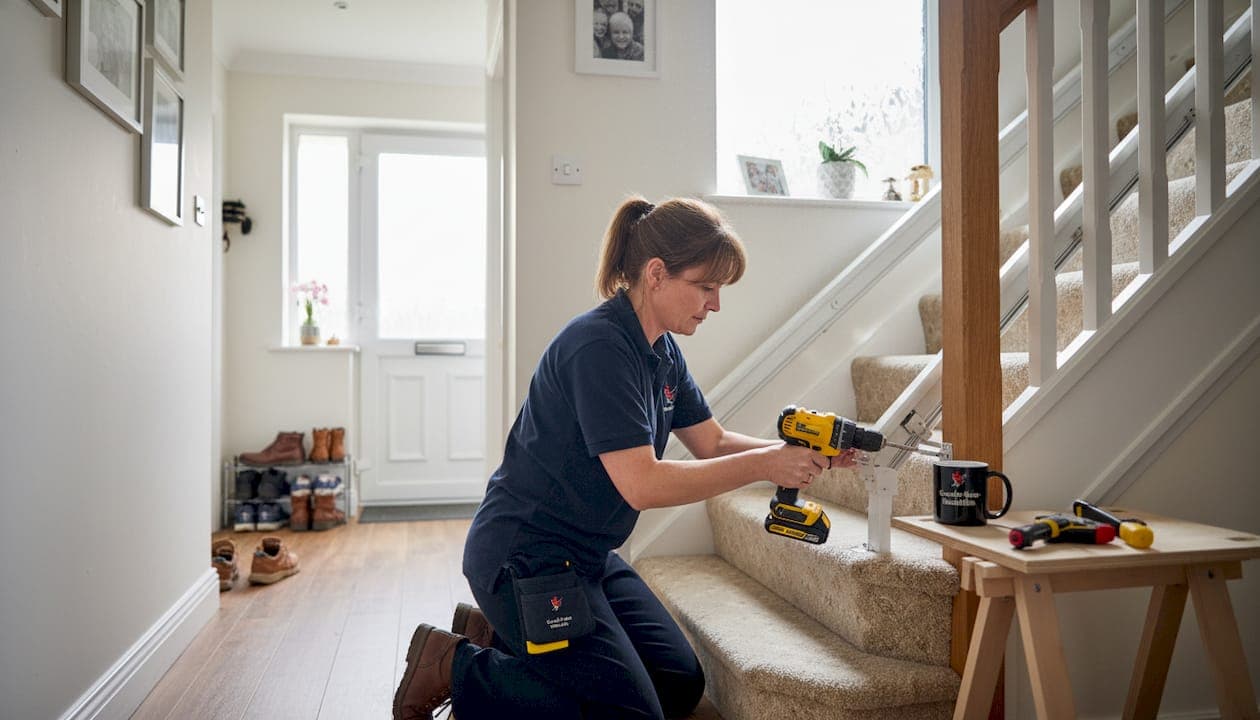
Commission a professional survey. A quick stairlift installation from a reputable provider starts with a home survey, not a catalogue order. A surveyor will catch issues that measurements alone won't reveal.
-
Test before signing off. Ride the lift yourself if you are able, or observe the primary user doing so. Check for wobble, noise, hesitation, and ease of use at both ends.
Comparing rail configurations
| Configuration | Best for | Risk level | Cost indicator |
|---|---|---|---|
| Full straight rail | Straight stairs without landings | Low | £ |
| Continuous curved rail | Curved or multi-landing stairs | Low | £££ |
| Two separate straight lifts | Stairs with intermediate landing | Low to medium | ££ |
| Folding platform bridge | Short landing workaround | High | Avoid |

Pro Tip: Ask your installer to position the bottom parking point so the folded chair clears the first step entirely. This prevents the chair from becoming a trip hazard for household members who use the stairs independently. It's a small detail that makes an enormous difference in busy households.
Exploring accessibility upgrades for safer homes alongside stairlift fitting can also reveal complementary changes, such as improved banister grips or step-edge strips, that collectively reduce fall risk throughout the home.
Safety checks and functional testing after installation
Once your stairlift is positioned and installed, your next priority is to confirm it meets all safety and functional standards.
Installation day is not the finish line. It is the starting point for a safety verification process that protects the user from day one. Many stairlift incidents occur not because of a fundamental design flaw but because a feature was never tested after fitting, or because a small fault developed unnoticed.
Post-installation safety checklist
- Seatbelt: Fasten and unfasten several times. It should click firmly and release cleanly with a single action.
- Obstruction sensors: Place a rolled-up towel on the footrest path and activate the lift. It must stop immediately. If it doesn't, do not use the lift.
- Emergency stop: Press it mid-journey. The lift should halt smoothly, not jerk.
- Swivel seat: At the top of the stairs, confirm the seat locks facing the landing before the user attempts to stand. An unlocked swivel is a serious hazard.
- Battery backup: Switch off the mains supply and complete a full journey. The lift must operate without interruption.
- Rail integrity: Check all visible brackets and fixings for secure attachment to the stair structure.
As highlighted in guidance covering stairlift safety standards, every one of these features must be tested rigorously after installation. Assuming they work because they were included in the specification is not enough.
Understanding stairlift weight limits is another important post-installation step. Every model has a maximum load rating, typically between 120kg and 160kg for standard units, and exceeding it puts strain on the motor, the rail fixings, and the safety mechanism. Confirm the model is appropriate for the user before the first journey.
Pro Tip: Keep a simple log sheet near the stairlift. Each week, note the date and tick that the seatbelt, sensors, and emergency stop have been checked. This takes under two minutes and gives you an early warning if something begins to feel different. It also demonstrates due diligence if you ever need to make a warranty or insurance claim.
Learning how to properly maintain your stairlift between professional visits is straightforward. Keep the rail free from dust and debris, wipe the track with a dry cloth monthly, and listen for any new sounds during the journey. A grinding or clicking noise that wasn't there before is always worth reporting promptly.
Troubleshooting and optimising for long-term safety
Now that your stairlift is up and running, it's important to know what to watch for and how to respond to common placement-related challenges.
Even a perfectly placed stairlift can develop issues over time, and some of those issues trace back to placement decisions made at the outset. Recognising the warning signs early prevents small inconveniences from becoming safety risks.
Common placement-related problems
- Seat misalignment at the landing: The seat doesn't reach the correct position for safe exit. This often means the top rail overrun wasn't set correctly during installation.
- Sensor nuisance tripping: The obstruction sensor halts the lift repeatedly without any actual obstruction. This can indicate the sensor is positioned too close to the wall or banister, a placement issue rather than a product fault.
- Track vibration or noise: Excessive noise suggests a rail bracket has worked loose, or the rail was not fixed to a structurally sound part of the staircase.
- Slow travel speed: Can indicate a track that needs cleaning, or that the rail curve tolerances were set slightly out during fitting on a curved stair.
- Difficulty swivelling at the top: If the seat requires significant force to swivel, the top parking position may be fractionally short of the correct stopping point.
For most of these issues, the first step is to contact your installer. Do not attempt to adjust rail brackets or modify the track yourself. The fixings carry the full weight of the user and the carriage, and incorrect adjustment creates a collapse risk.
Important: A stairlift that stops and restarts unpredictably, or one where the seat wobbles noticeably during travel, must be taken out of service immediately. Do not use the lift until a qualified engineer has inspected it. The risk of a user being stranded mid-stair or thrown from the seat is not worth the convenience of continued use.
When issues persist despite servicing, it may be time to assess mobility needs again from the beginning. Sometimes a user's condition changes, and the original stairlift model or placement is no longer the best fit. A perch-style lift that worked well after a knee operation, for example, may not be suitable for someone who later develops balance difficulties and needs a fully seated, high-backed unit.
Placement also affects how well the stairlift serves all occupants of the home. If the unit is parked in a position that creates a pinch point on the landing, family members may unconsciously start avoiding that area or rushing past it, which creates its own fall risk.
A fresh perspective on stairlift placement: safety is a dynamic process
Most guides treat stairlift placement as a one-time decision. You choose the position, the engineer installs the rail, and that's that. In our experience working with homeowners across the UK, that mindset is where problems begin.
The reality is that the "right" placement at the time of installation can become the wrong placement within a year or two. A user who walked confidently to the bottom of the stair and sat down independently may later find that journey difficult. The home itself may change; a new sofa in the hallway, a door that now stays open, a grandchild's bike stored in the hall. These shifts seem minor, but they alter the environment the stairlift operates within.
We believe that revisiting placement should be treated as a routine part of stairlift ownership, not a reaction to something going wrong. An annual access review, where you walk through the full journey from room to room and honestly assess how the stairlift fits into the current reality of the household, is worth more than any number of technical inspections alone.
There is also a subtler point that rarely gets discussed. The confidence of the user changes over time. Someone who was anxious about using the stairlift on day one may, six months later, be rushing onto the seat without engaging the seatbelt properly. Conversely, someone who grew more frail may be gripping the armrest so tightly during travel that a different seat style or armrest position would dramatically improve their experience.
Exploring affordable stairlift solutions isn't just relevant at the point of first installation. It's worth revisiting when circumstances change, because upgrading or adapting your stairlift to match current needs is nearly always more cost-effective than dealing with a fall or a loss of independence.
Plan annual access reviews as a standard household habit, especially in homes with changing occupancy or where the primary user's health condition is progressive. It takes less than an hour and could prevent a serious incident.
Find the right stairlift solutions for your home
With these steps and insights in mind, you're ready to take the next action for your home.
Choosing the right stairlift is much easier when you have expert guidance behind you rather than a product catalogue in front of you. At Gentle Rise Stairlifts, we begin every installation with a free home survey, because no two staircases or households are identical.
Our range covers straight, curved, and reconditioned stairlifts, with prices starting from £795, and our most reliable stairlift options are backed by industry-leading safety standards and rapid installation times. Whether you need a permanent solution or a short-term rental during recovery, we have options that fit your timeline and budget. Our Protect+ aftercare and support programme keeps your stairlift running safely long after installation day. Visit our stairlift solutions page to book your free survey and speak with a specialist today.
Frequently asked questions
What measurements do I need for stairlift placement?
You need the stair length, width, and the turning radius at any landings to ensure the rail fits correctly and the chair parks safely at both ends.
Are folding platforms safe for short landings?
Folding platforms are best avoided on short landings, as guidance confirms they pose trip hazards compared to full rail coverage, which is always the safer option.
How often should I test my stairlift's safety features?
Test all safety features immediately after installation and at least once a year thereafter, as rigorous post-install testing of sensors, seatbelts, and emergency stops is essential for ongoing safe operation.
Who should inspect or service my stairlift?
A qualified technician should carry out all inspections and servicing to keep your stairlift safe, reliable, and within the terms of any warranty or aftercare plan.